> ## Documentation Index
> Fetch the complete documentation index at: https://docs.onsomble.ai/llms.txt
> Use this file to discover all available pages before exploring further.
# Team
> Invite colleagues into your Onsomble account, manage outstanding invitations, and remove access when someone leaves.
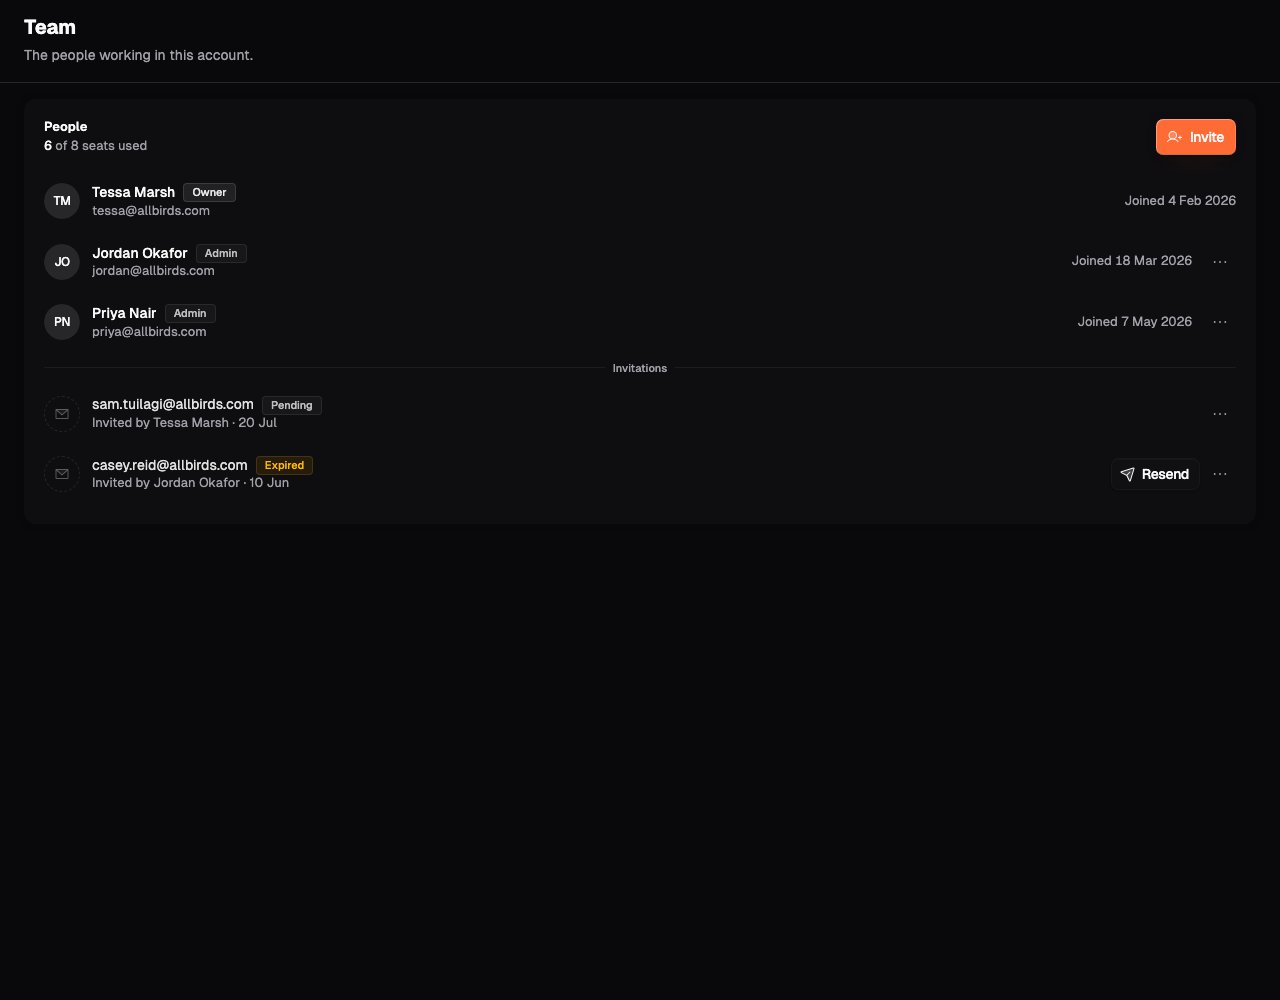
Onsomble accounts are built for teams: everyone you invite works in the same account — same sites, same scans, same history. The **Team** page under **Settings** shows who has access, who has been invited, and how many seats your plan gives you.
 ## Who can do what
Everyone you invite joins as an **Admin**. Admins can do everything in the account — run scans, manage sites, invite and remove other members, change account settings — with one exception: the plan and billing always belong to the account **Owner**. Every account has exactly one Owner, and the Owner can never be removed or demoted.
## Inviting a colleague
Enter your colleague's email address. If that email already belongs to an
Onsomble account, we'll tell you straight away — an account can only belong
to one team.
It names you and your account, so they know exactly what they're joining.
The link inside is personal to them and expires after seven days.
The acceptance page locks in their invited email and lets them prove it's
theirs with a password, Google, or an emailed sign-in link. No separate
email confirmation, no onboarding — they arrive straight in the account,
ready to work.
Inviting an email that already has an outstanding invitation offers to resend
it instead of creating a duplicate — handy when the first email went missing.
## Seats
The count at the top of the page shows how many seats you're using. A seat is
taken by every member **and** every outstanding invitation, so an invite you
sent yesterday counts even before it's accepted. Expired invitations stop
counting until you resend them.
When every seat is taken, inviting pauses. Upgrading the plan is the Owner's
action — Owners see the upgrade path right on the page, and plan options are
at [onsomble.ai/pricing](https://www.onsomble.ai/pricing). Dropping to a
smaller plan never removes anyone; it only pauses new invitations until
you're back under your allowance.
## Managing invitations
Outstanding invitations are listed with the members, marked **Pending** or
**Expired**:
**Resend** — issues a fresh link and cancels the old one. Use it when the
email was lost or the link expired.
**Revoke** — cancels the invitation immediately. A revoked link stops working
the moment you click.
## Removing someone
Open the menu on a member's row and choose **Remove from team**. Their access
ends immediately — but removal is not deletion:
**Their work stays.** Every scan and change they contributed remains in your
account, still attributed to them by name.
**Their login survives.** They can be invited into another account — or back
into yours — at any time, and they can create an account of their own.
Nobody can remove the account Owner, and you can't remove yourself. If you're
handing an account over entirely, contact support.
## If you're signed in without an account
After being removed from a team — or if you signed in before accepting an
invitation — you'll see a screen explaining that you're not part of an
account right now. Invitations always arrive by email, so accept from the
link in that email to join a team, or create an account of your own from the
same screen.
## What's next
How plan allowances work across seats, sites, and scans.
Your own details, and the account's name and profile.
## Who can do what
Everyone you invite joins as an **Admin**. Admins can do everything in the account — run scans, manage sites, invite and remove other members, change account settings — with one exception: the plan and billing always belong to the account **Owner**. Every account has exactly one Owner, and the Owner can never be removed or demoted.
## Inviting a colleague
Enter your colleague's email address. If that email already belongs to an
Onsomble account, we'll tell you straight away — an account can only belong
to one team.
It names you and your account, so they know exactly what they're joining.
The link inside is personal to them and expires after seven days.
The acceptance page locks in their invited email and lets them prove it's
theirs with a password, Google, or an emailed sign-in link. No separate
email confirmation, no onboarding — they arrive straight in the account,
ready to work.
Inviting an email that already has an outstanding invitation offers to resend
it instead of creating a duplicate — handy when the first email went missing.
## Seats
The count at the top of the page shows how many seats you're using. A seat is
taken by every member **and** every outstanding invitation, so an invite you
sent yesterday counts even before it's accepted. Expired invitations stop
counting until you resend them.
When every seat is taken, inviting pauses. Upgrading the plan is the Owner's
action — Owners see the upgrade path right on the page, and plan options are
at [onsomble.ai/pricing](https://www.onsomble.ai/pricing). Dropping to a
smaller plan never removes anyone; it only pauses new invitations until
you're back under your allowance.
## Managing invitations
Outstanding invitations are listed with the members, marked **Pending** or
**Expired**:
**Resend** — issues a fresh link and cancels the old one. Use it when the
email was lost or the link expired.
**Revoke** — cancels the invitation immediately. A revoked link stops working
the moment you click.
## Removing someone
Open the menu on a member's row and choose **Remove from team**. Their access
ends immediately — but removal is not deletion:
**Their work stays.** Every scan and change they contributed remains in your
account, still attributed to them by name.
**Their login survives.** They can be invited into another account — or back
into yours — at any time, and they can create an account of their own.
Nobody can remove the account Owner, and you can't remove yourself. If you're
handing an account over entirely, contact support.
## If you're signed in without an account
After being removed from a team — or if you signed in before accepting an
invitation — you'll see a screen explaining that you're not part of an
account right now. Invitations always arrive by email, so accept from the
link in that email to join a team, or create an account of your own from the
same screen.
## What's next
How plan allowances work across seats, sites, and scans.
Your own details, and the account's name and profile.